Category Archives: Charger control project

Electricity Purchase to July 2018

In the last few days I’ve reported our status on electricity generation from our solar panels and our gas consumption, so here comes some thoughts on electricity purchase from the grid.
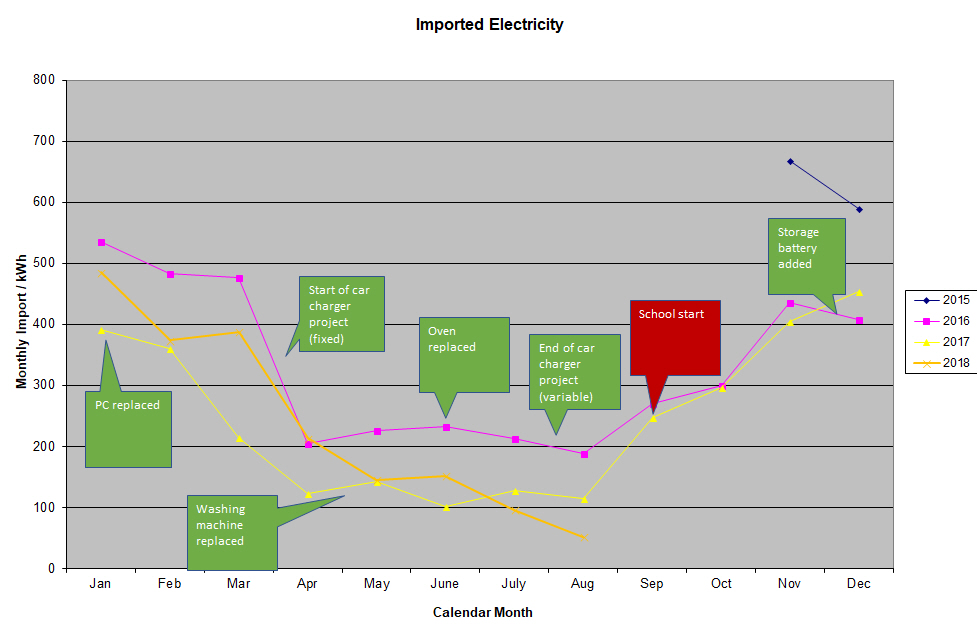
Starting in late 2015 after the meter was changed to Economy 7, there’s a general downward trend from November 2015 to March 2016, before my car charger project kicks in maximising use of my own solar electricity to charge my car (when available) which causes a significant drop in purchased electricity between march and April 2016.  That seasonal saving gradually drops through the autumn, although it’s interesting that by November 2016 we’re back on what seems to be a continuation of a downward trend from January to March 2016.  Electricity purchased is also significantly lower than 2015 as we enter the second year.

The second significant change is the addition of the storage battery in December 2016.  However from January to August 2017 (yellow) electricity purchased is significantly below the prior year (magenta) – potentially showing the benefit of the battery in saving electricity generated during the day to reduce consumption later in the day.  This benefit largely disappears from September to December 2017, presumably because my increased vehicle mileage after my daughter started school is offsetting the prior savings.

2018 (orange) generally falls somewhere between 2016 and 2017 as it combines both the storage battery and the higher vehicle mileage throughout the year to date.

The August 2018 figure is a projection based on the first few days of the month only, but may yet come to represent the month as a whole being a function of:  (i) record solar outputs, (ii) continuing battery storage availability, and (ii) no school in August leading to reduced mileage.

Ampera – selecting the charge current

My charger control project relies on the electric vehicle tracking the charge current set by the external EVSE / charger to maximise use of the solar panel output.  Most vehicles would readily follow such a signal, but not the Ampera.

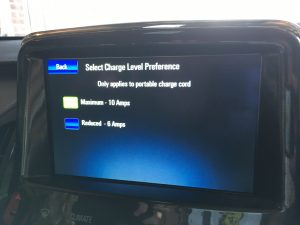
The Ampera is designed to default to charging at 6 Amps when using a Mode 2 cable (that is one with a household plug).  Such a cable normally signals 10 Amps to the vehicle (a safety margin inside the UK’s 13 Amp domestic plugs) but the Ampera is designed to draw only 6 Amps by default.

To enable the Ampera to charge at 10 Amps the user has to permit this for every charging event individually.

This screen is reached by selecting Charging | Charge Current. Typically I would push the button in the driver’s door to open the flap over the charge port / vehicle inlet and then select the charge current via the touchscreen before leaving the vehicle.

Current limit from EVSE / AmpsCurrent drawn by vehicle / Amps - 6 Amp settingCurrent drawn by vehicle / Amps - 10 Amp setting
666
10610
1614.314.3

With my Ampera, if the 10 Amp setting is not selected, then the EVSE / charger risks going into an error condition as the Programmable Logic Controller (PLC) expects the control signal from the ImmerSUN to turn off after a few minutes as rising vehicle current should cause the ImmerSUN relay output to cycle on and off around the available current limit. If the 10 Amp setting is effectively disabled then one might not reach the point at which the relay cycles within a reasonable time which the PLC will detect as an error.

Daytime charging as quickly as possible

On Wednesday an unusual pattern of vehicle use occurred (at least for me) which showed another way the charger could be used. I needed to take my daughter on a round trip in the morning (dad’s taxi), return home, and then repeat the trip later in the afternoon. Each round trip pretty much exhausted the range of my electric car, so I needed to recharge in between. My normal home charge routine would have prioritised the home storage battery, but that would have left me completing the second round trip partially on petrol which isn’t the optimum solution.

To fully recharge the vehicle to complete the second round trip (and thus avoid using petrol) I disabled the programmable logic controller (PLC) on the car charger using a push button which suspends the program causing the charger to operate at full power. It was a sunny day (at least for March) so the solar panels were producing a similar amount of power to that required to charge the car and, with the fixed battery partially charged during the period I was making the first round trip, the fixed battery was able to manage the difference between power generated by the panels and that required by the home (including car charging) for much of the period.

The result was an almost fully charged car for the second round trip (sufficient to avoid using petrol) for only around 1kWh of grid energy.

Zappi?

It’s now over a year since I built my solar-powered car charger which is enabled automatically by surplus electricity output from my solar panels, but can also be run on a timer when required to use cheap night-time power too.

However since then a new product has come to market from myenergi (a new company led by some of the team responsible for developing the ImmerSUN) which provides the same sorts of capabilities although in a professionally-produced solution. I don’t own one, I’ve never used one, but I think that this is a solution which I’d be seriously considering if I hadn’t already made something similar.

The only downside that I can see is that it’s available in either Type 1 or Type 2 forms with tethered leads only, so if you have a mixture of EVs then a single Zappi may not be compatible with all your vehicles; whereas a charger with a Type 2 socket outlet would be.

You can learn more about Zappi here

Generations of my solar charger

I just came across some of the pictures from last year of different iterations as I was developing my solar powered car charger.

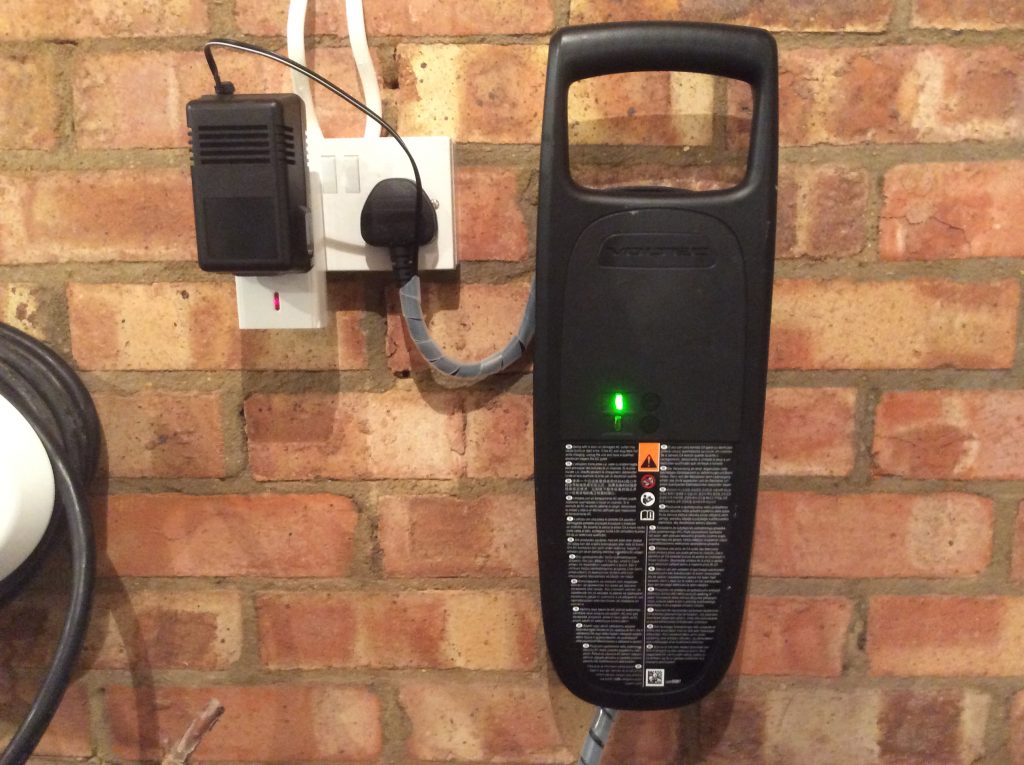
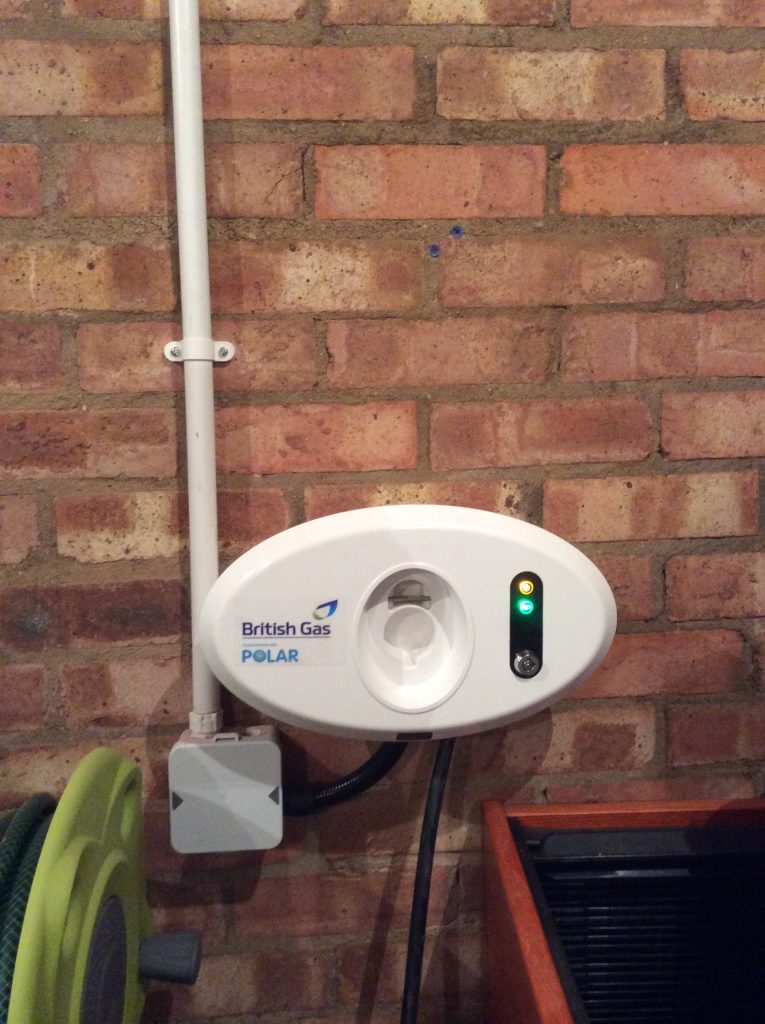
The left picture shows my first attempt using a Mode 2 charger (i.e. one that plugs into a standard socket outlet). The design attempted to turn the car on and off by the equivalent of pushing the latch button on the vehicle connector. That approach stopped charging effectively, but starting charging was subject to long delays so that wasn’t a practical solution.

The middle picture show the second attempt using a commercial Mode 3 charger (i.e. one that’s hardwired into the fixed wiring). In this iteration the commercial charger was gutted so that, although it retained the original external appearance, inside was all different content including a protocol controller and a radio receiver. This was an effective on/off solution.

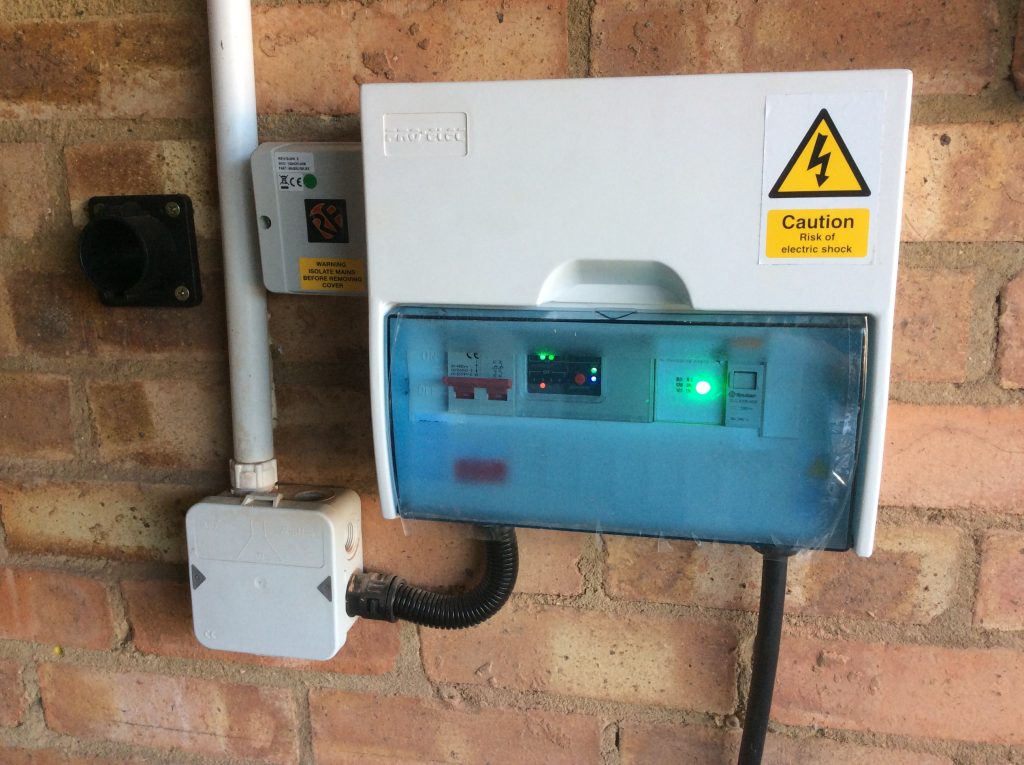
The right picture shows the third iteration which addd a programmable logic controller to generate a variable charge rate for the electric car i.e. more than just simple on/off. The hardware to achieve this is too bulky for the case of the commercial charger, and so it was repackaged in consumer unit case. A consumer unit case is cost-effective solution for a bigger box to house the DIN rail mounting components, but is of course only suitable for indoor use as it’s not waterproof to the required standard for outdoor use.

Contents of my solar car charger

Stepped Mode 3 EVSE in consumer unit case

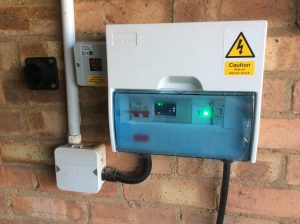
My electric car charger is built into a case more normally used for household consumer units.  From left to right its contents are:

  1. 2 slots – Double pole on/off switch to isolate the incoming mains supply entering from below.
  2. 4 slots – Programmable Logic Controller (PLC) which takes 2 inputs (remote on/off via radio link and contactor status – see item #4) and generates 1 of 4 outputs (corresponding to off, 6 Amps, 10 Amps or 16 Amps).  Beneath the PLC (and not visible inside the case) sits a circuit board with an array of resistors corresponding to the required current settings.
  3. 2 slots – Protocol controller which handles the Mode 3 handshake with the car and switches between current settings based on the selected resistor.
  4. 1 slot – Contactor which turns the power to the vehicle on/off based on the output from the protocol controller.  Cable to car exits below.
  5. 1 slot – unused.

The dedicated charger circuit is fed from a RCBO in a small consumer unit on the other side of the garage which combines overcurrent protection (20 Amps) and Type A residual current detection (30 mA).

To the left of the car charger are two external items. On the far left is a cable dock into which the vehicle connector plugs when not charging the car to help keep the contacts clean. To the near left is a radio receiver which receives an on/off signal from a transmitter in the house. The transmitter is enabled when surplus solar power is available or when grid electricity is particularly cheap.

A mixed August day of charging


Today I was at home working on a DIY project while the car was on charge for much of the day, a day which was fairly mixed in weather terms.  I thought it would be appropriate for an update on the car charger which has been in operation for around a year.

You may recall that the car generally remains plugged into the charger whenever it is at home, but doesn’t generally charge until there’s sufficient surplus on the solar panels, unless timed charging has been enabled for when the weather isn’t so sunny.

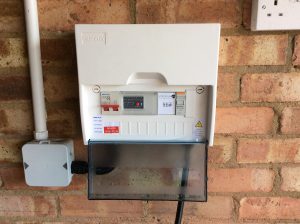
The picture shows the charger itself built into a case intended for a consumer unit.  Alongside the charger sits the receiver for the Mainslink system which provides for a radio signal from the house turning on the charger in the garage.  The smaller black unit is the holster for the vehicle connector so that it doesn’t lie on the floor when not in use.

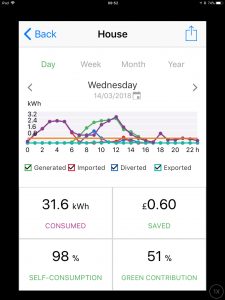
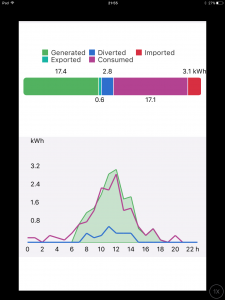
The screenshot to the left shows the electricity consumption of the house including the car charger (the purple line) tracking the output of the solar panels (the green area).  Any failure to fully use all the electricity available causes the remaining electrical surplus to be diverted via a proportional control to the immersion heater to make hot water (the blue line).

Over the course of the day although we’ve used 17.1 kWh of electricity directly, and another 2.8 kWh of electricity for water heating (making 19.9 kWh used in total); but we’ve bought only 3.1 kWh of electricity.

Latest software update

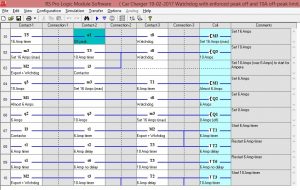
Part of the ladder logic program in the PLC

This afternoon I’ve spent a little time working on the charger. The charger stopped working on Monday after the power was interrupted for an hour or so while other electrical work was completed. A quick check at the time concluded that the radio link between the immerSUN and the charger had stopped working, and that the problem wasn’t a fuse, but other time commitments prevented further investigation until now.

The radio link carries the control signal from the immerSUN in the airing cupboard to the car charger in the detached garage.  The control signal is generated either when the immerSUN has detected that a suitable surplus of PV electricity is available to want the car charger enabled or its output current increased; or when a timed boost is programmed in the immerSUN typically to do overnight charging on cheap rate Economy 7 power; or indeed when a manual boost is demand via the immerSUN front panel, app or web portal.

Fortunately lack of the control signal doesn’t prevent car charging as I can disable the integral PLC (which leaves the charger on continuously) and allow the car’s internal timer to control when the car charges.

This afternoon I’ve successfully re-paired the receiver to the transmitter to restore normal charger operation and uploaded my latest software to the PLC.

The capabilities of the charger are now as follows:

Operating currents: 6, 10 and 16 Amps
Maximum continuous current (continuous grid load current):10 Amps
Peak current (from PV + battery only):16 Amps
Range switch interval:6 minutes
Minimum on time:10 minutes
Control signal watchdog (not during Economy 7 hours):15 minutes
Control source:ImmerSUN

Best use of generated power (cont.)

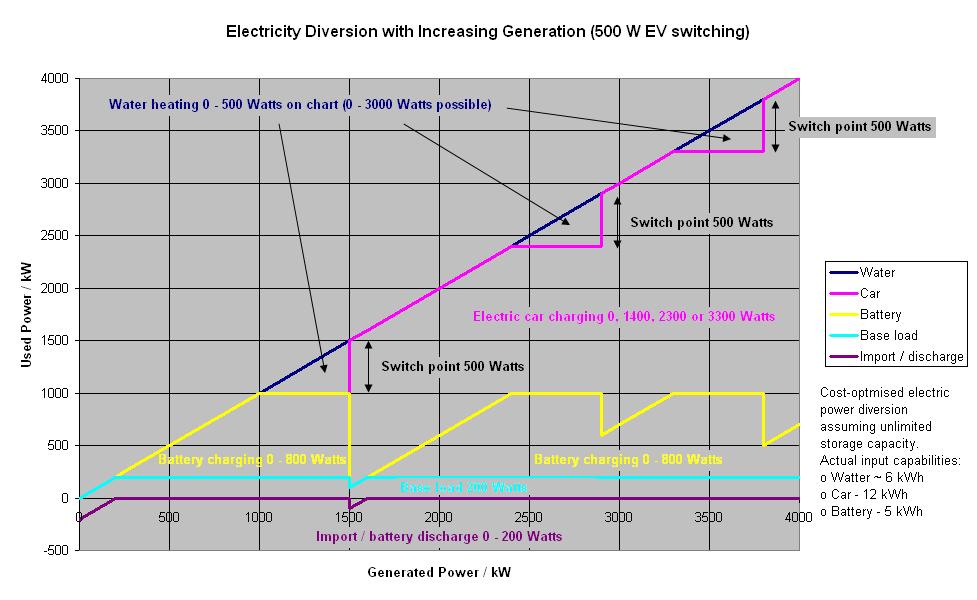
In order to illustrate how the combination of battery and immerSUN distributes generated electric power at different levels of generation I created this chart.

For different levels of power generation across the bottom, the chart shows how the power is divided between battery charging (and occasionally discharging), electric car charging, and water heating; which are generally prioritised in that order. My prior post explained the rationale for the 500 Watt switching threshold for the vehicle charger – based on 1.4 kW of mid-value car charging being better value than a mix of 800 Watts of high value battery charging and 600 Watts of low value water heating.

Alternatively you might like to consider that the horizontal axis represents passing time after daylight comes and that the chart shows how diversion changes as the sun reaches its zenith.  You might then view the end of the day as a mirror image of this as the output of the panels ramps down in late afternoon, although at the end of the day there’s the greatest possibility that one or more of the storage devices is/are full and thus the greatest chance of electricity being exported.

Of course all of this assumes that the storage devices aren’t already full, and indeed that the electric car is present at all. As storage devices fill, or indeed if the car is absent, the system automatically switches to the next best value alternative:

  • Battery full – more car charging and/or water heating.
  • Car full or absent – more battery charging and/or water heating depending on power output.
  • Hot water at maximum temperature – this is the lowest priority electricity use so when this is full we don’t currently have another use to divert power to. However there is an unused output on the immerSUN so it would be possible to drive another load. The underfloor heating in the kitchen would be a possibility, although there’s unlikely to be much overlap between days when there’s enough surplus to reach this point and days when kitchen heating is required so it may never repay the cost of fitting the cables.

Best use of generated power

Over the last few days I’ve been rethinking the best use of generated power.
The prioritisation of battery charging over water heating is clear due to the significant cost difference between day time electricity and any time gas, but the situation on car charging is more complex. It occurred to me that there could be times when prioritising battery charging and water might not always be the lowest cost solution since car charging avoiding mid-price nighttime electricity might be a bigger saving than a lesser amount of high value battery charging combined with low value gas-replacement.

For example, if we look at the lowest level of EV charging that amounts to about 1.4 kW. With our night-time rate of 7.87 p/kWh, 1.4kWh of solar power used for car charging saves 11.0 p of night time electricity.  If the battery is maxed out at 800 VAh that saves 7.34 p of later day time electricity. The water heating using the balance of 0.6 kW saves a further 1.76 pence of any time gas. Thus the total save from 1.4 kWh used for a combination of battery charging plus water heating is 9.1 p, compared to 11.0 p from car charging – so it would appear to be better value to do 100% car charging when a 1.4 kW surplus exists.

A bit of further analysis aimed to establish the point at which it became better value to charge the car, rather than combine battery charging and water heating, even if that involved a small level of mains import. The answer is that, with my energy costs, it makes sense to enable 1.4 kW of charger when 1.3 kW of export would have existed thereby potentially importing 0.1 kW. In practice this 0.1 kW may be supplied by the battery.

Given that the battery has priority by the way it’s wired, and takes up to 800 VA, then I intend to try a 500 W export threshold to start the car charger since 800 VA + 500W ~ 1.3 kW.