Category Archives: HEMS Project

Better than free electricity

A couple of times last week our dynamic electricity price excelled itself by going negative so we were actually being paid to use electricity. This situation typically arises when the weather is unusually windy causing a surplus of renewable power. Then, rather than the wind turbines being turned off to eliminate excess generation, the market price drops to encourage more consumption. Such additional consumption at the cheapest times will be a combination of genuinely increased consumption (such as my own shift from gas water heating to electric) and shifting electricity consumption from more expensive times to cheaper times (such as my own electric car charging and static battery charging).

Electricity price and consumption for Monday 9th December

The electricity price dropped as low as -4.85 p/kWh between 3:30 and 4:00 AM, with an average consumption-weighted unit price of 0.62 p/kWh. The red line shows the electricity price in p/kWh on the left-hand scale, the blue shows the average consumption in this billing month, and the bars show today’s consumption driven by today’s prices. (The right hand cost column is missing the leading ‘-‘ symbol where appropriate.)

The increasing electricity consumption as the price falls is driven by automated control of loads driven by my HEMS. The HEMS controls fixed battery charging (and discharging), electric car charging, and water heating in response to electricity price.

Report on Agile Octopus last weekend from The Guardian.

You can learn more about Octopus Agile here and save yourself an extra £50 if you decide to switch.

Stepping up

One of the features of the way my HEMS works is the inverse relationship between electricity demand and electricity price – electricity demand increases as the price falls and falls as the price rises. This effect helps to contribute to my low average cost for electricity – 5.63 p/kWh ex-VAT most recently (Sep/Oct 2019). The effect exists because my different controlled loads (battery, car and water heating) each need different times to achieve full (approximately 8, 5 and 2 hours respectively).

Relationship between HEMS-controlled loads and electricity price.

This chart is illustrative only because day-to-day needs for the different loads may change, and also the electricity price varies half-hour-by-half-hour and day-by-day but typical recent behaviour is shown. The actual rules for each device may be summarised as follows:

  1. House baseload – support house from battery when cost greater than 10 p/kWh (limit adjusts automatically to reflect pricing on the day), otherwise take baseload from grid.
  2. Storage battery charging – charge from the grid in cheapest 5 hours over entire 24-hour period.
  3. Car charging – charge for a total period of so many hours within a window between arrival time at home and departure time the next day, and also any hours during day at equivalent price or lower.
  4. Water heating – charge for the cheapest 2 hours when electricity price falls below gas price (did not occur on day illustrated below).
Electricity consumption in kW versus time overnight.

These same loads may also be enabled in priority order when the solar panels are in surplus. Priority is:

  1. Baseload
  2. Storage battery charging
  3. Car charging
  4. Water heating.

HEMS in action

Yesterday provided a good example of my HEMS in action as the electricity price dropped quite low due to stormy weather conditions. Normally at this time of year the HEMS isn’t doing much with the storage battery as daytime solar output is enough to fully charge the battery, but yesterday low pricing was enough to automatically enable both battery charging and water heating overnight. Car charging was due to run anyway driven by the demand for an hour of charging, but battery charging and water heating was triggered by the low price rather than a needed to take power for a pre-defined period of time.

HEMS schedule 9th August

The screenshot above from my phone shows the HEMS’ plan for the the early hours of the 9th. The first price column shows one hour of car charging at the cheapest price. The second column shows half an hour of water heating as the electricity price has fallen below 3.5 p/kWh when it is assumed to be cheaper than gas. The third column shows four hours of battery charging when the electricity price is below 5 p/kWh.

Metered electricity consumption (HAN side) 9th August

The above image from the HAN side of my smart meter shows the energy consumption of the house varying through the night in response to these requests from the HEMS – battery charging at the widest point, car charging above that for an hour, and water heating above that for 30 minutes.

Half-hourly metered consumption (WAN side) and electricity price for 9th August

Finally this image shows the energy consumption versus price data for the same period shows how the action of the HEMS increases electricity demand as the price drops. Indeed on this day there was virtually no consumption at any other time.

For August 9th as a whole I paid 52 pence for 7.547 kWh of electricity. Taking off the 21 pence for the standing charge leaves 31 pence for the electricity kWhs alone, an average of 4.11 p/kWh.

HEMS Wiring Update #2

Today I’ve further refined the wiring of the relays on the HEMS. At the time that I’d originally wired it I didn’t have small enough flex, or indeed multi core, which created an unnecessary number of cables (one per used relay) of over large size (and thus difficult to insert into the terminals). During the week I acquired some smaller gauge multi core allowing me to wire all three relays with a single cable containing one live feed and three switched live returns.

Revised HEMS wiring with multi core to HEMS relay outputs

Of the 5 incoming / outgoing cables at the bottom (left to right):

  1. Incoming mains (live / neutral / earth) from mains plug
  2. Live and switched live to / from ImmerSUN output relay to activate car charger.
  3. Live and switched lives to / from HEMS to activate car charger and water heating.
    • Red – live to contacts
    • Green – switched live for car charger direct – charge in response to price
    • Black – switched live for car charger indirect via ImmerSUN relay output – enable proportional charge in response to surplus PV
    • White – switched live for water heating – heat in response to price
  4. Outgoing mains (switched live / neutral / earth) to RF solutions radio transmitter to activate car charger, and on the second cable clamp..
  5. Outgoing switched live and neutral to ImmerSUN Boost relay input to enable immersion heater.

The revised wiring diagram looks like this..

Revised HEMS wiring #2

All of this still leaves one unused relay on the HEMS (HAT #3) and one unused proportional output on the ImmerSUN (#2; available for future expansion.

Initially even my smallest boot lace ferrules would not fit into the terminals on the HAT. Fortunately, once the ferrules has been crimped around the new cables, and flattened by squeezing in pliers, then the ferrules could be persuaded into the terminals.

The Big Picture

After a series of quite detailed posts, I think that the time has come for an updated high level overview of what we have.

Heat loss from the home

We moved to our early 1970s house almost 4 years ago bringing with us our electric vehicle. The house had already been refurbished with new double-glazed windows, had cavity insulation (although that wasn’t recorded on EPC so must have predated the prior owners), and a token level of loft insulation. The existing gas boiler was arthritic, couldn’t heat the whole house, but was quite good at heating the header tanks in the loft! We had gravity-fed gas hot water (i.e. no thermostat or pump on the cylinder) which was completely obsolete, the cylinder dated back to the building of the house and had no immersion heater (although we had the wiring for one). So what did we do?

Space heating:

Eve Thermo eTRV
  • We substantially increased the loft insulation to reduce heat loss.
  • We had a modern condensing gas boiler installed to improve efficiency.
  • We updated to smart controls using eTRVs to set both temperature set points and schedules at room level. I built a smart interface to the boiler so that heating can be enabled remotely. I programmed a series of rules into Apple Home allowing the smart thermostats to enable the boiler when any thermostat wants heat and disable it when no thermostat wants heat. Some rooms also have additional rules linking heating to open windows or movement sensors. All of this reduces heat losses by only heating rooms that are (or will be shortly be) in use.

Electricity supply:

Solar panels
  • We installed our own solar panels given 4 kWp generation. (I also own a small share of a solar farm although there’s no contract that I’m aware of between that farm and my home energy supplier)
  • I invested in an immerSUN to maximise self-use of our own solar by enabling loads when surplus solar is available.
  • We switched to a green electricity supplier so when we need to buy electricity it comes from renewable sources.
  • We bought a small storage battery 4 kWh to store some of our solar production for use later in the day. Subsequently I can also use it in winter to buy when the electricity price is relatively low to avoid buying when the price is relatively high.
  • We chose a dynamic smart tariff to buy electricity at the lowest price based on market prices established the day before. The prices change each half hour and are established in the late afternoon on the day before.

Water heating:

Hot water cylinder
  • We replaced the old hot water cylinder with a modern insulated one (to reduce heat loss) with a low immersion heater (to allow more of the water volume to be heated).
  • Our principal water heating is now by diverting surplus solar electricity proportionately to the immersion heater, that’s backed up by the gas boiler which is enabled briefly in the evening for water heating in case the water isn’t yet up to temperature, and when the electricity price falls below the gas price I can enable the immersion heater on full power.
  • All accessible hot water pipes are insulated.

Electric car charger:

Electric car charger.
  • I built my own electric car charger that takes an external radio signal to switch between four settings 0, 6, 10 and 16 Amps to help me adjust consumption to match to availability of output from my solar panels. (Subsequently such products were developed commercially with continuously variable current limits, but the limitations of my immersun and on/off radio signal don’t allow me to go quite that far. Having said that my car only does 0, 6, 10 and 14 Amps so I would gain no benefit from a continuously-variable charger paired with a 4-level car).

Smart electricity controls:

Smart controls
top: HEMS (to manage bought electricity) and junction box
mid: radio transmitter (to car charger)
bottom: immersun (to manage self-consumption)
  • We have two systems for smart control of electricity:
    1. The immersun to maximise self-use of our solar electricity by proportional control of loads.
    2. A HEMS to manage the purchase of electricity (when necessary) at the lowest price by maximising consumption when the price is lowest.
  • When both systems want to enable loads (because the bought price is low and we have a surplus from our own panels) then cost is prioritised, so we’ll buy from the grid any demand not being met from our own panels.
  • Both systems are linked to 3 devices:
    1. Battery storage. The immersun is configured to work alongside the battery storage with the battery storage as the top priority to receive surplus solar PV. The HEMS can switch the status of the battery as required to charge from the grid when the price is lowest, or to discharge when the price is highest, or indeed to revert to default behaviour.
    2. Car charger. Second priority for the immersun after battery storage.
    3. Immersion heater. Third priority for the immersun after car charging.

The future

I have no firm plans for the future. I’m toying with adding to the HEMS various features including:

  • Making the display switch between GMS and BST as appropriate (it’s all UTC at the moment).
  • Edit configuration via the web interface rather than a virtual terminal.
  • Control a domestic appliance. Our washing machine was replaced relatively recently, but the dishwasher is playing up a little and may be a candidate for HEMS integration where the optimum start time is selected to deliver lowest energy price.

HEMS Wiring Update

Late last year I started adding the ability to optimise my electricity price by shifting some electrical loads around in response to a dynamic electricity tariff. My electricity price changes half-hour-by-half-hour and day-to-day, with the prices for the day ahead published each afternoon. I already had the ability to manage the same electrical loads to maximise use of the output of my own solar panels for some 3 years. The first load smartly controlled to follow my electricity costs was my electric car charging, but I have subsequently added optimisation of water heating and storage battery behaviour.

However, time has revealed an occasional issue arising when both the bought electricity price was low and a solar suplus was available, so both sources sought to enable the car charger; but in practice the vehicle didn’t charge. The issue here is that the car charger does a sanity check on the radio signal indicating that it should be operating, which fails since the combination of two signals driving a common radio transmitter can lead to excessive duration of the ‘on’ signal which fails the sanity check.

Revised HEMS wiring

My chosen solution is to disable one of the two signals sources when the other wants the car charger on. I’ve chosen to make the price signals via the HEMS the master, so when the HEMS wants to charge the car HAT #4 opens so that the ImmerSUN no-longer has influence over the car charger, and HAT #1 is used to control car charger behaviour. When the price is relatively high HAT #4 remains in the normally closed position and HAT #1 is open allowing the ImmerSUN to control charging behaviour via its output relay to use any surplus solar. (HAT refers to HArdware on Top – accessory circuit boards that mount on top of a Raspberry Pi. In my case board with 4 output delays. HAT #3 is currently unused.)

Enhancing the HEMS

Over the last few months I’ve gradually been adding to the capability of my HEMS which determines when is the cheapest time at which to buy electricity for different purposes. After initially controlling my car charging only, I’ve now added both immersion heater control and battery storage control.

Desktop HEMS view with real-time Immersun status alongside

To the left and centre the picture shows the plan of the HEMS for two twelve hour blocks of time from when the cost data was last updated by my supplier. To the right is the real time display of my home. It’s a dull day so only 258 Watts is coming from the solar panels (maximum of 4,000 Watts), and so the HEMS has been buying energy from the grid to charge the battery when the price is low.

For each of the panels to left and centre, the electricity price is displayed for each half hour, with the colour-coded decision of the HEMS for what to do.

The EVSE (for charging the car) shows 3 of 4 possible statuses:

  • red – the energy price is above a configurable upper cost threshold, so the car will never charge.
  • green (not shown) – the energy price is below a configurable lower cost threshold, so the car will always charge.
  • yellow – these are the cheapest half-hours. The HEMS will enable charging for the required number of half hours to deliver a configurable number of total hours with a user-defined time window (typically overnight for the car). Overnight was configured for only 1 hour, although 5 would be more typical for a full charge.
  • orange – these half hours are more expensive. The HEMS will not enable charging in these hours unless the configuration is changed for more hours.

Water heating follows the same control strategy, but is configured to only heat water during plunge pricing events when the electricity price falls below the gas price.

Operating pattern for car charger and water heating

Configuration parameters allow customisation of:

  • Upper cost threshold – never charge when price above this threshold.
  • Lower cost threshold – always charge when price below this threshold.
  • Start of time window – arrival time for charging.
  • End of time window – departure time for charging.
  • Target hours – number of hours of charging/heating required within time window.

Battery control is configured similarly, but has more states than simply on and off, and correspondingly more colours. The colours reflect those used by the battery manufacturer. I currently use only 3 states:

  • blue – normal – the battery automatically either chargers or discharges either to absorb any surplus solar electricity or displace bought electricity when demand exceeds solar availability. Here used when the electricity price is highest.
  • light green – charge only – will charge proportionately to any solar excess as above, but will not discharge. Here used for mid-range electricity costs.
  • dark green – force charge – charge at maximum power drawing power from the grid as necessary. Here used for lowest electricity prices.

HEMming it up

Here we have the whole assembly mounted on the side wall of the airing cupboard above the hot water cylinder. The whole assembly is mounted on a board which can be lifted off two screwheads. The cables are sufficiently long to allow the whole assembly to be placed on the floor should update be required.

Below the assembly can be seen a socket outlet which provides power for the low current controls only. The Raspberry Pi that provides the HEMS functionality is powered by a re-used USB mobile phone charger. All this control side can be isolated by the simple expedient of pulling out the plug. The high current power for the immersion heater is hardwired via the ImmerSUN. All power is provided via the fused spur with single pole switch that originally powered the immersion heater alone.

As an aside at this point, some ImmerSUN users have reported issues with power connectors melting as indeed have I in the past. In my installation the chances of this occurring are minimised by:

  1. Use of multistand flex for wiring rather than solid twin-and-earth.
  2. Use of bootlace ferrules to terminate the ends of the cables before insertion into the screw connectors.
  3. Use of cable ties to secure the flex to the chassis of the ImmerSUN on the provided locations adjacent to the cable entry.


HEMS Installation

The illustration shows the components mounted on a board before installation on the side wall of the airing cupboard.

To the top left is the HEMS itself (less cover) with 4 black output relays visible on the HAT of which two are connected via the white cables to operate car charger and immersion heater. Immersion heater software isn’t written yet but will mirror the charger software but on a second channel. Not illustrated is the power cable to the HEMS – a standard mobile telephone charger and USB cable.

To the top right is a 10-way junction box typically used for boiler installations. It takes switched inputs from the HEMS (x2) and ImmerSUN and uses them to drive the two outputs (radio transmitter and ImmerSUN Boost).

To the middle right is the existing radio transmitter used to operate the car charger. In this new installation it can be enabled either by the HEMS when the bought electricity price is low or by the ImmerSUN when our solar panels are in surplus.

To the bottom is the ImmerSUN. In addition to power in and power out to the immersion heater, there are also two control signals: (i) a relay contact that closes when solar is in surplus to drive the car charger and (ii) a relay input that can be configured as ‘Boost’ enabling full power to the immersion heater on an external signal (in my case from the HEMS).

HEMS for car charging

My holiday project is to create a Home Energy Management System (HEMS) able to optimise the costs to charge my electric car.   I currently have a smart energy tariff where the electricity costs can vary each half hour and day-to-day as a function of market price variations,  The role of the HEMS is to select the cheapest time to charge the car.  It will potentially control other loads in future, although car charging is my priority.

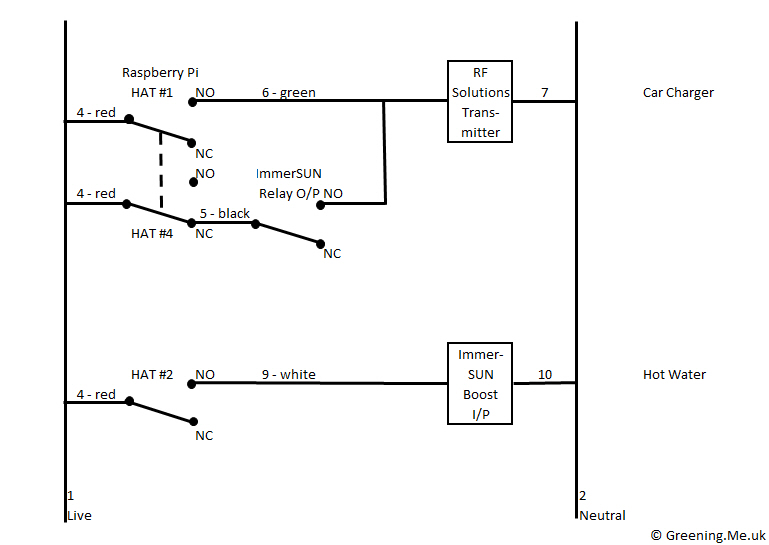
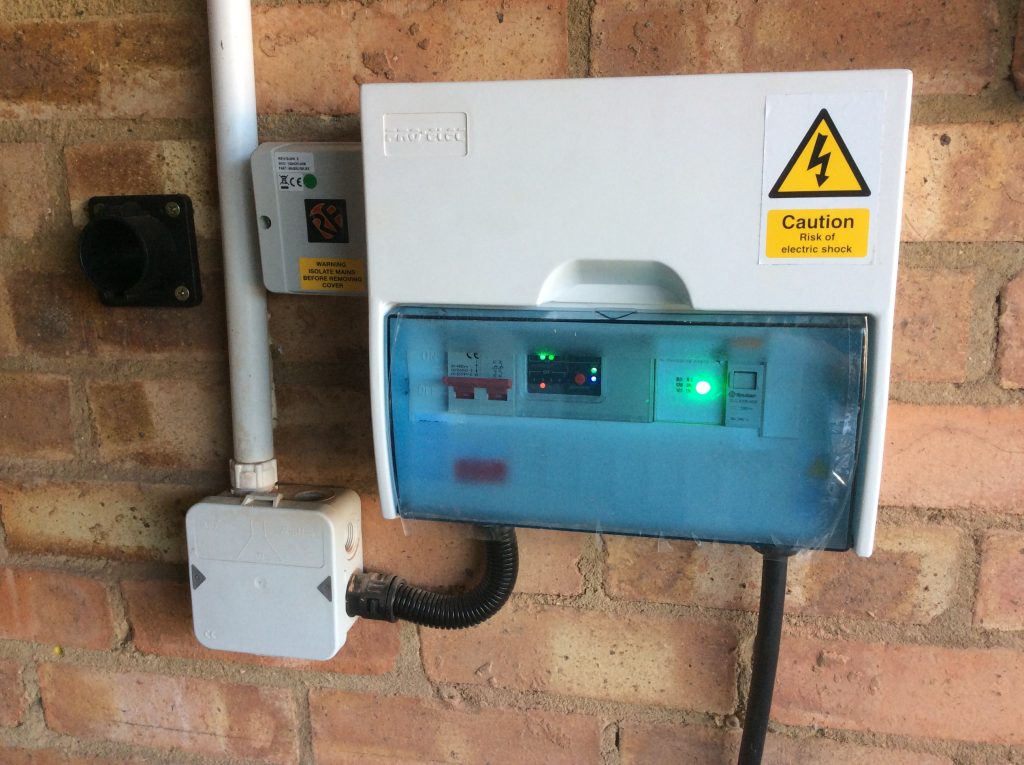
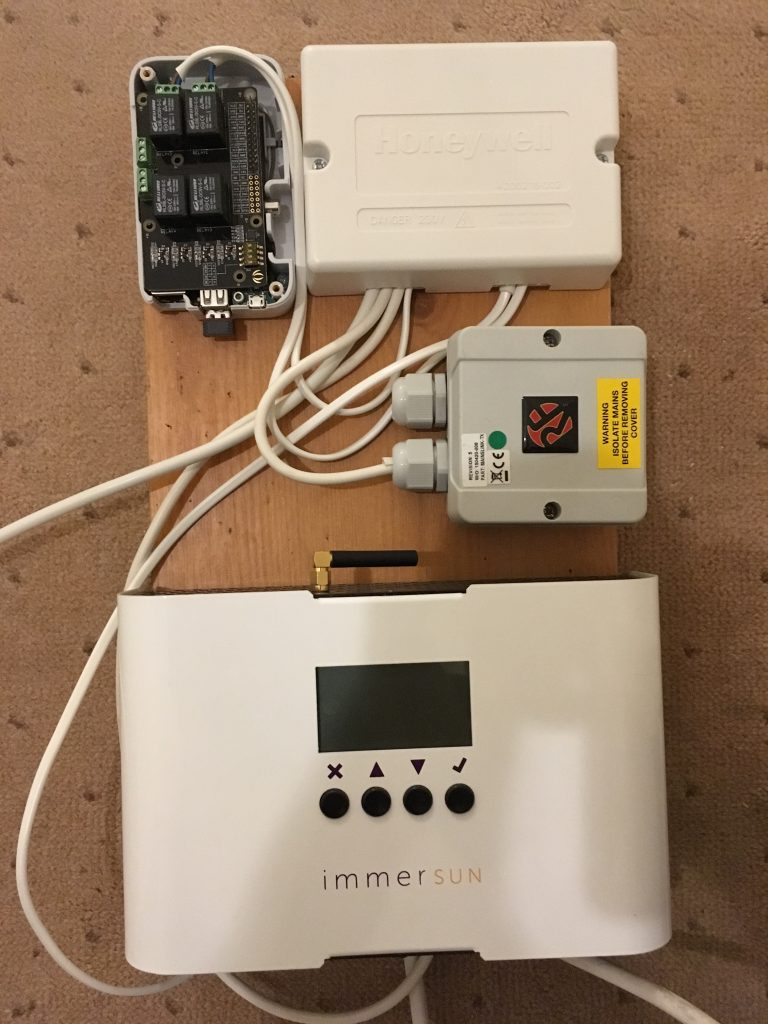
The HEMs is creating using a small computer called a raspberry pi which can read the electricity prices from my supplier when they are updated each day.  Software of my own creation then decides when to turn a relay on or off to enable/disable the car charger,  A configuration file can be edited to influence its behaviour.  A charging schedule is built once daily and then a seperate process actions the schedule every half hour.  An existing radio link, which is already used to automatically enable my charger when the solar panels are in surplus, will signal that the charger should be enable or disabled.

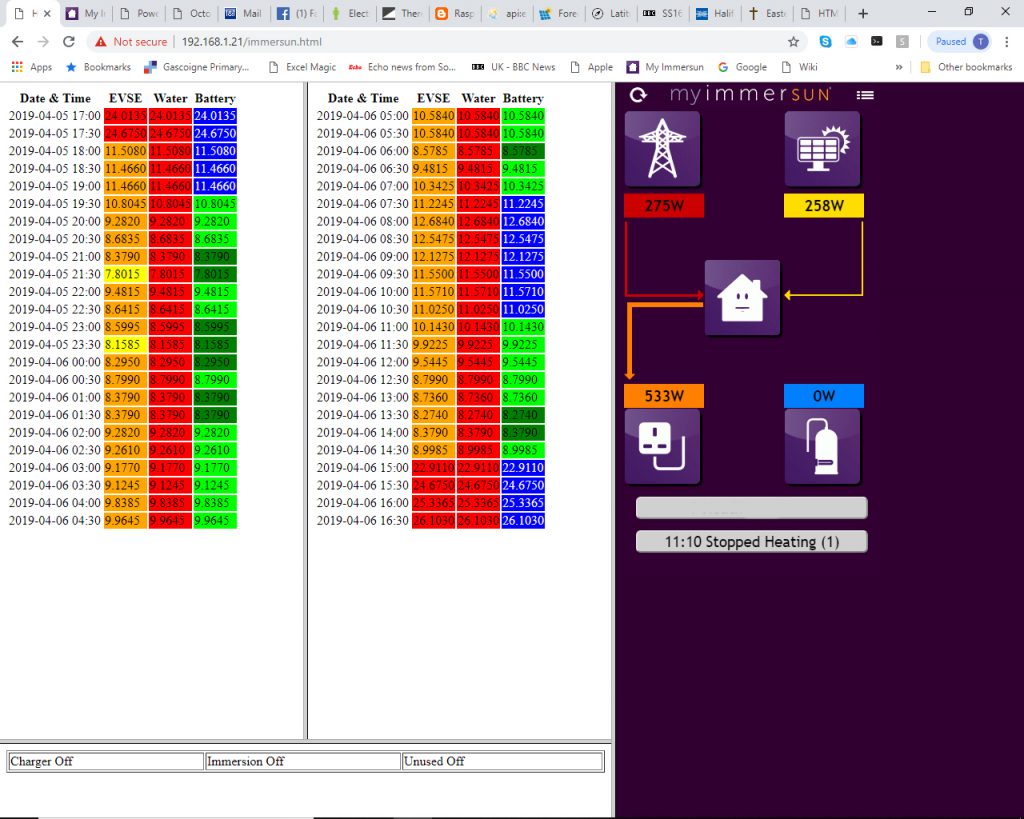
I now have the HEMS running on my desk, although it’s not yet mounted in a case or wired to the transmitter.  I have also created a small webpage to show the status. 

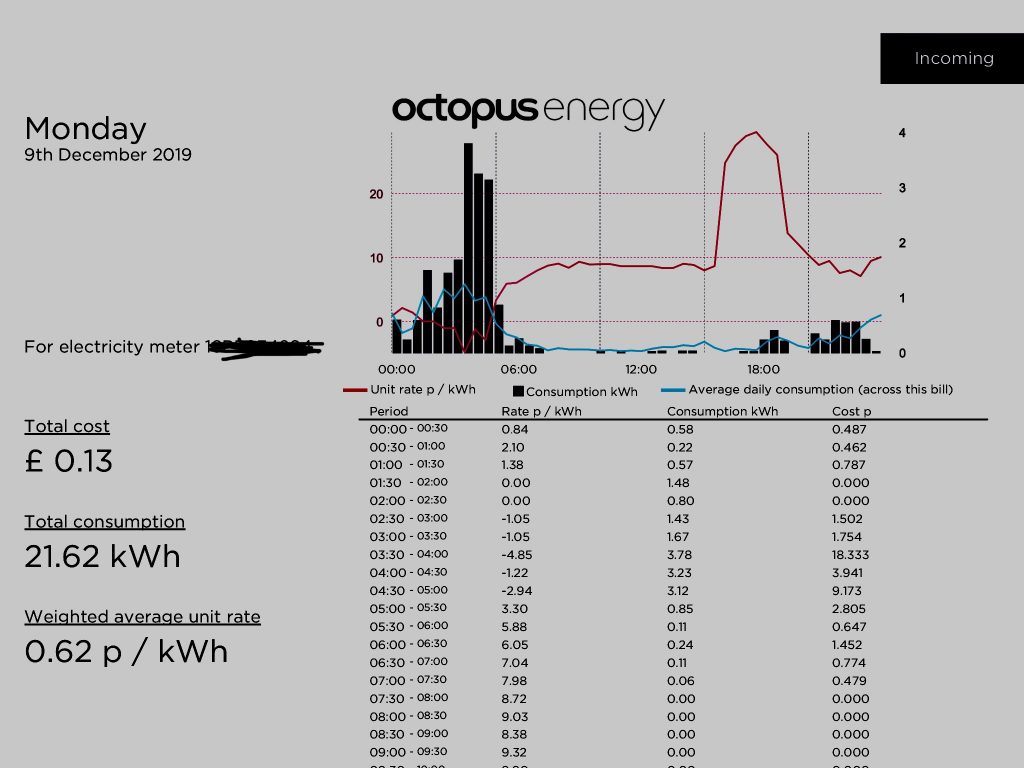
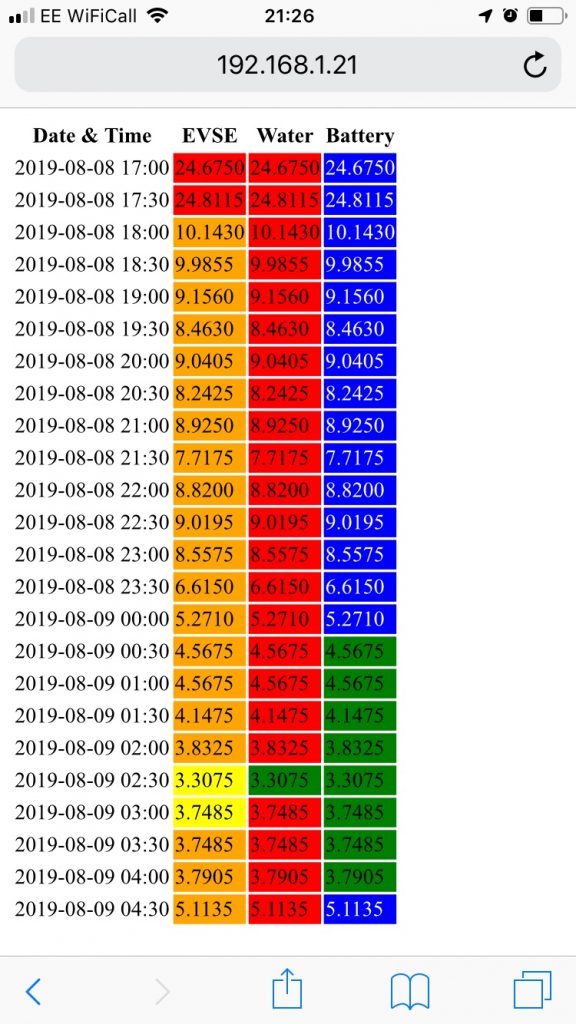
The webpage shows the 48 half-hour blocks between 5:00 PM one day and 5:00 PM on the next day.  Each block shows the time, electricity price per kWh, and the resulting car charger schedule.  It should be noted that there’s often much more variation in price through the day than is illustrated here.  Indeed sometimes the price can go negative.

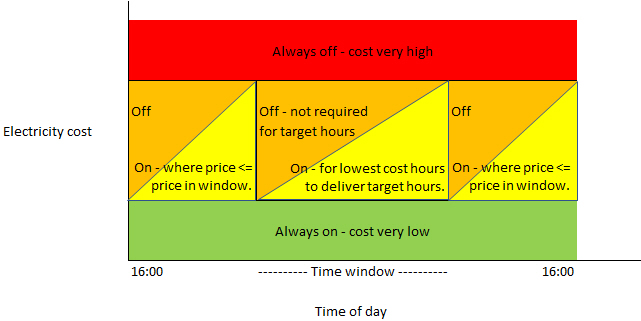
The green block indicates a period where the price is below a floor price.  The car charger is activated any time that the price drops below the floor price.

The yellow blocks indicate that the charger will be enabled for a total of 3 hours (2.5 yellow plus 0.5 existing green) within a user-defined time window to achieve an acceptable state of charge by next morning.  The user can define both the time window and the number of hours of overnight charging required.  A further block of yellow occurs outside the window in the afternoon where the price is within the range of these cheapest hours within the window, 

The orange blocks indicated when the charger could be enabled if more hours of charging were required than the 3 hours currently specified by the user.

Finally, the red blocks indicate where the price exceeds a user-defined ceiling price at which charging will not occur.

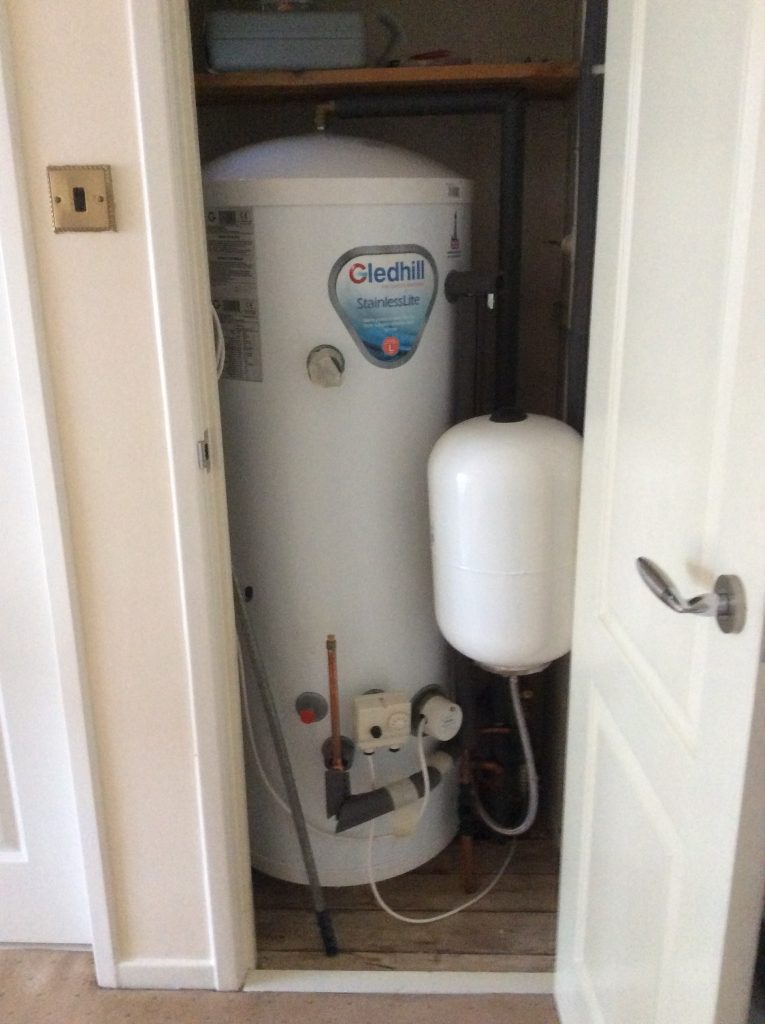
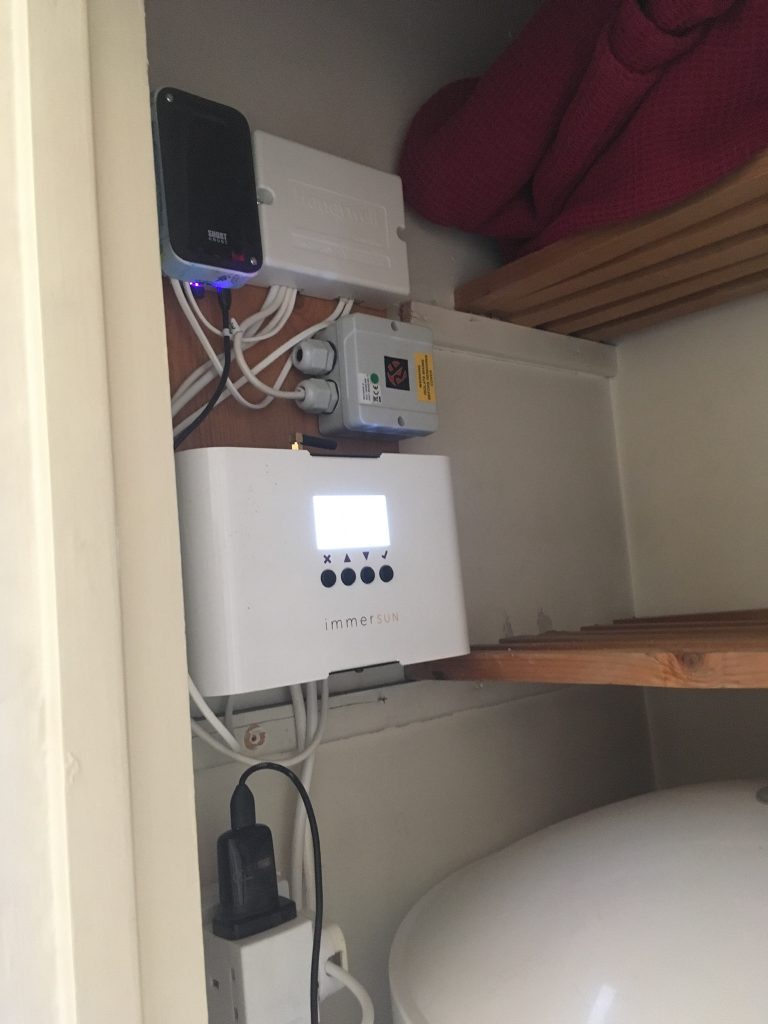
My next steps are to do a little more testing on the bench while I await delivery of the case, install the system into the case, and then install it in the airing cupboard.

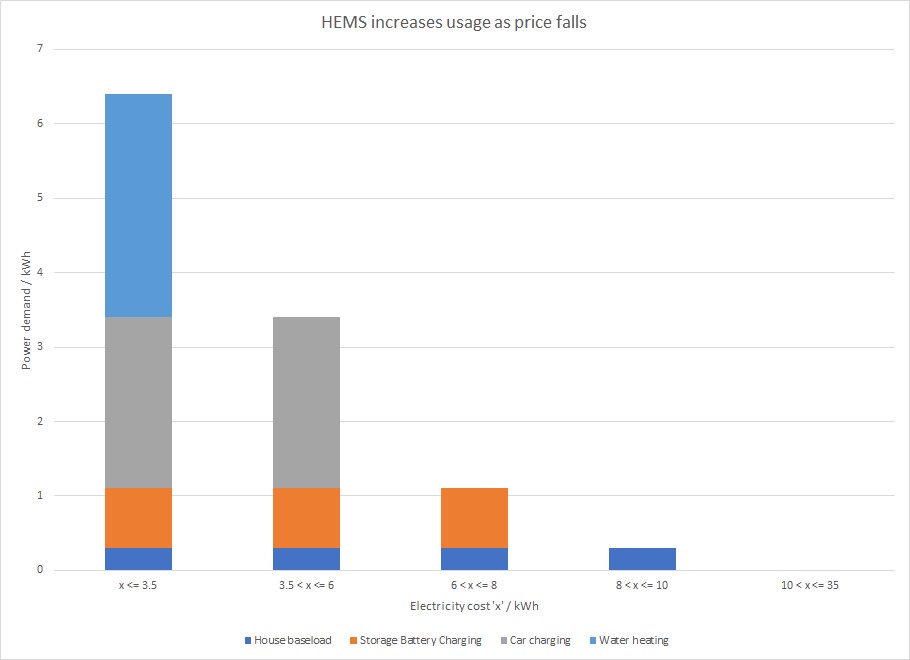
In the longer term, my chosen hardware can switch up to four mains electrical loads.  I anticipate adding the immersion heater so that hot water can be made when the electricity price falls sufficiently to make that attractive versus solar or gas.  I could also enable some underfloor electric heating, but the costs to transmit a suitable control signal across the house would not be recovered by the small energy saving.